 I finally get time to update... three days late. So here we go, days 9, 10 and 11. (Full disclosure: These were all shot on the same day. This 365 may just be a 365 days of new photos uploaded and discussed.)
I'll start with
Ill start at the beginning. I don't have my off camera triggers yet so I have my speed light on camera but set to manual. This is in our basement that has really low white ceilings so I knew I could bounce the light off ceiling making it my large light source for the room, which is small. Bouncing the light from a ceiling will help to soften shadows and eliminate or at least lesson the "point and shoot" pop-up flash look. Next you will see a dark line in the lower left at the corner of the stripped edge of the mat. That's the edge of a reflector and I used this to help direct the light from the ceiling onto the front of the monkey. Its a Westcott 5 in 1 Photo Basics. In this case I was using the silver side because I wanted a sharper light to help bring out the highlights on the.. uh, fur. I have it facing the front of the subject to help lesson the shadows I knew I was going to get from the light coming straight down off the ceiling. The last part is the white(ish) bed sheet. This would be the poor mans white seamless backdrop. :) The sheet helps to bounce light around the subject, reflect up on the subject and throw a little more light at the reflector as well as making a nice clean backdrop. Ironing it would have helped but it was late, I was lazy and I knew I could pretty well over expose the the sheet without killing the subject and keep a shallow depth of field to get rid of most of the shadow lines from the wrinkles. Next time however, I will iron it.
Day 9 Details: Canon 50mm f/1.4, ISO:100, f/2.8 @ 1/250sec (I'll try to remember the strobe settings for next time)
Day 9 Details: Canon 50mm f/1.4, ISO:100, f/2.8 @ 1/250sec (I'll try to remember the strobe settings for next time)
9. I don't think it turned out to bad over all. I did have to bring up the exposure a bit in LightRoom because my lack of ironing and my flash being limited to sitting on my camera created a few shadows from wrinkles. I also learned how much I want a new IPS based LCD and calibration software. It took me several tries and then uploads to Flickr to (mostly) get rid of the lines and shadows in the back ground. I couldn't see them in LR but once uploaded and viewed through a web browser they showed up. I kept tweaking the exposure to lessen them or eliminate them.
UPDATE: 1/13/2010. Ugh... now that I am at work and looking at this I can see I didn't get rid of the shadows as much as I thought. Really, really need a good monitor and calibration tools.
Day 10 Details: Canon 50mm f1.4, ISO: 100, F1.4 @ 1/250sec
UPDATE: 1/13/2010. Ugh... now that I am at work and looking at this I can see I didn't get rid of the shadows as much as I thought. Really, really need a good monitor and calibration tools.
Day 10 Details: Canon 50mm f1.4, ISO: 100, F1.4 @ 1/250sec
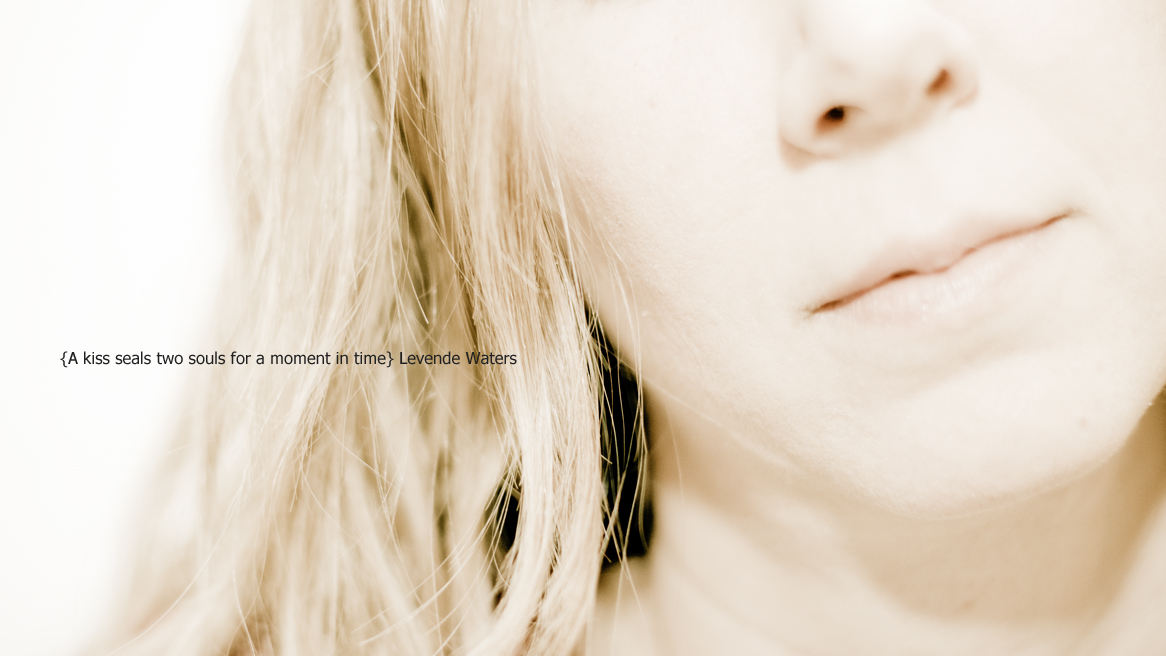
 10. This has become my favorite photo to date for the simple fact that I (mostly) intended it to look like it does. This is the first photo of a person (my lovely wife) where I directed them on how I wanted them to pose and composed a shot. I knew I wanted a shallow depth of field so her lips would be the thing in focus. If I had it to do over I would have more of her left eye in the shot more but over all I am pretty happy considering the location. I cropped it to a 16x9 aspect (just like the monkey) because I am somewhat obsessed with that style right now. The setup is the same as above, exact same spot other than I am using the gold side of the reflector to warm up the light hitting the subject and I am holding it to the left of the camera just out of the frame. So its closer than it was to the monkey.
 Day 10 Details: Canon 50mm f1.4, ISO: 100, F1.8 @ 1/250sec
11. Same as above... same location. I have a few more shots like this on my Flickr page but this one I chose for my 365. I really liked her hair and the black ear-ring against the white background. The one thing I did different here is held the reflector directly in front of her. If I had it to do over I would have held it much closer... or had her hold it. That could have worked too. The shadows were softend under her neck but not eliminated. I dont think they look bad but I would have liked them gone better.
What I learned.... do something, anything to shoot. Experiment. I had read about using a sheet out doors here at DPS and figured it would work well indoors too. I Think it worked pretty well. It took a few tries before I was happy with the exposure but once I was happy I only took a few shots. I need to shoot more and move around a little more. On camera flash makes this a little harder because any time you move so does the flash and then your flash to subject distance is changing and can cause everything to be over or under exposed. The final thing that motivated me to do this was this blog entry from Chase Jarvis. If your into photography you should follow this guy and keep an eye on his blog.
What I learned.... do something, anything to shoot. Experiment. I had read about using a sheet out doors here at DPS and figured it would work well indoors too. I Think it worked pretty well. It took a few tries before I was happy with the exposure but once I was happy I only took a few shots. I need to shoot more and move around a little more. On camera flash makes this a little harder because any time you move so does the flash and then your flash to subject distance is changing and can cause everything to be over or under exposed. The final thing that motivated me to do this was this blog entry from Chase Jarvis. If your into photography you should follow this guy and keep an eye on his blog.
1 comments:
Andy, I really like the #10 shot of your lovely wife. I think this is the best shot of yours that I have seen thus far. I agree with your critique and would add only one thing. If you were to do it again I would have her pull the sweater on her right shoulder over to cover the pink strap there. That's about all I can add to this. Really nice, clean & simple. Great shot! I like the DOF, color, saturation, and everything else. Keep it up!
Post a Comment